Photography’s Rule of Thirds
27/07/2018 - Simply C Photography
Cherry Beesley of Simply C Photography explains Photography’s Rule of Thirds;
The best things come in threes…
If you’re interested in photography, the chances are that you will have heard of the Rule of Thirds. It’s one of the first things that budding photographers learn and is something that I cover in my Suffolk-based camera training workshops.
If however, this isn’t ringing a bell for you, let me explain briefly what the Rule of Thirds is, and why learning it is the first step towards capturing fantastic imagery, whether for personal or professional use…
More of a Guide than a Rule
Whilst it is called the ‘rule’ of thirds, I must stress that it is more of a guide (some things can require a little break from the norm, depending on what you are shooting!) however it’s a key principle when it comes to composition and it will help you to create more pleasing, balanced and compelling images.
The Rule of Thirds in practice
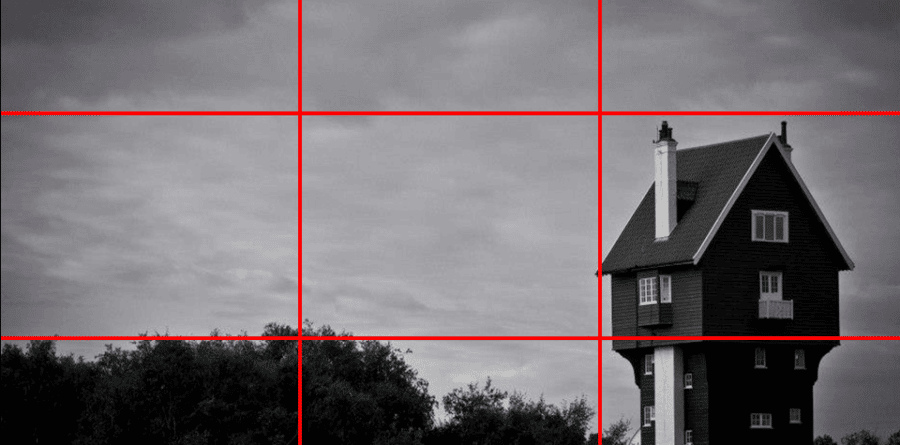
Essentially, the ROT is a ‘grid’ that you can place over your image (using the viewfinder or in the LCD panel on your camera). It consists of two horizontal lines and two vertical lines at equal distances, where the lines intersect, is generally where your ‘points of interest’ should lie.
Many people tend to simply point and shoot what they see, yet studies show that our eyes naturally gravitate towards a point of interest rather than the centre of a scene, so this is a simple way to make that stand out.
Another common mistake (although I used the term mistake quite loosely as photography can be extremely subjective and I wouldn’t want to dictate a ‘right and a ‘wrong’ way to do things), is to place the horizon slap bang in the middle of the image.
Instead, use one of the horizontal lines from your Rule of Thirds grid and balance it out with your subject along one of the vertical lines. This should immediately transform your image.
What about landscape or cityscape photos?
It may be the case however, that you are taking a photo of an entire ‘scene’ with several points of interest, and wish to capture the whole picture.
This is often also the case when photographing a conference or event for example, where you wish to show the room as a whole.
In these instances, it may not make sense to place any subject at a particular intersection – but the rule of thirds still applies.
This time, it’s the horizontal lines that once again prove useful. Simply line up your view finder, breaking up the scene into three ‘rows’, which will balance your image and avoid instances where you are showing either too much or too little floor or ceiling.
Can the Rule of Thirds be used when photographing people? Yes, absolutely!
You have probably come across lots of people images, including corporate head shots that feature a person sat slap bang in the middle of the frame, yet this doesn’t always result in the most interesting picture.
Shift that person slightly to the left or to the right, at one of the intersecting lines, and you will instantly see the difference.
The ROT is also really useful for lining up a person’s eyes, and will prevent them from looking as if they are sat up too high, or too low.
Once piece of advice I’d like to leave you with is this, don’t be afraid of ’empty space’ – it’s important not to try and squeeze too many subjects or points of interest into one shot.
Empty space is vital when it comes to directing the viewers attention to what’s important, so embrace it! Experiment with the rule of thirds during your next photo shoot and see just how it can transform your own images.
Or, to learn more tips and tricks from a professional photographer, enquire about my camera training workshops.
Visit the NorfolkWire homepage for more Norfolk news

All articles on this news site are submitted by registered contributors of NorfolkWire. Find out how to subscribe and submit your stories here »
Related Blogs


Uncategorised
31/05/2022
Simply C Photography completes epic trampoline assignment
Contributed by Simply C Photography